

Its time to break out the fun stuff guys! Magick User's University is all about interesting crafts that can be useful during your travel through the world of Magick. Today, we're going to focus on a project of making a simple talisman today in Spellcraft 101.
+ So what are Talismans?
A Talisman is like an amulet—they are both objects used to promote and bring good luck, protection, or whatever the object is intended for to the user. History has seen many pass through the ages. The Ancient Egyptians had many dedicated to fertility, love, and even the Evil Eye. The difference between a talisman and an amulet, however, are merely the way they are activated. Amulets are passive—they are designed to work when the time comes for them to be activated. Talismans, on the other hand, are constantly working around the clock to ensure the success of their intended purpose.
There are many kinds and ways to make talismans, but this is a quick and effective way to get started. For this particular amulet, is a nice, general good one for protection.
+ SOULL'S PROTECTION TALISMAN +
This talisman is very general purpose, but made to be powerful, and incorporates many magickal elements within it. I'll explain them as we go.

+ Materials +
A pen or pencil
A marker
Two different colors of paper
Scissors
Tape
Yes, the picture quality was stellar. It was dark, all right!
Now, when collecting materials, this is a general rule: the better quality the materials, the better the result. If you “slap together a talisman”, it in return will “slap together some protection” or whatever you had made it for. If you want it to last a long time, take time and care in creating it. Now, I'm not saying make it out of solid gold or whatever, but using nicer materials than say, notebook paper, will yield greater results. For the talisman here, I'm using parchment and some nice scrapbook paper from an art supply store. The pen is a Faber-Castell—very nice and fine for making strokes. You'll see the results later.
For my own talismans, I like them pretty. I feel, for me at least, the better looking they are, the better the result. It might be a “judge a book by its cover move”, but I feel that the better looking it is, the more care put into them. For the backing of the talisman, I used some printed card stock from the scrapbook section. I chose the colors red, because red is strong and powerful. I didn't want calming protection, I wanted some that was BAM, in your face. So I chose red. Its energetic.
So lets begin, shall we?
+ One: Get into the right mindset. Remember what the talisman is for, and concentrate on that purpose as you make it. Start by cutting out the paper the size you want the talisman. Use a rectangular shape! Cut out the paper you are using for the backing larger than the one you will be writing on.
+ Two: Take the forefront sheet and grab your pen or pencil. I chose a pencil... in case I messed up.

Which I did. Several times.
This is where you will write your spell for protection. I decided, due to a conversation with my girlfriend (who is getting into runes... exciting!), that I would incorporate the runic alphabet. There is a certain power in mere symbolism that sometimes words fail to give.
I decided instead of a spell, to use the poem dedicated to the rune Algiz. It is a rune used for protection, thus making it perfect for the task at hand. The poem is from the Anglo-Saxon Rune Poem, and is as follows:
The Elk-sedge has its home most oft in the fen
It waxes in water, wounds grimly
The blood burns of every man
Who makes a grasp at it.
And, alternatively (if you'd like a modern translation):
The Elk-sedge usually lives in the fen
Growing in the water, it wounds severely
Staining with blood any man
Who makes a grab at it.
Print out the poem carefully in pencil on the talisman.
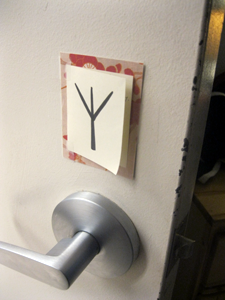
+ Three: After printing out the poem, take the marker and over it, draw out boldly the rune of Algiz. The symbol looks like a path that splits into three. It should look a little like this after its all done.

Very nice! You're almost done! The hard part is over.
+ Four: Tape the two papers together, so that the rune is showing on the outside, and you can see the color of the other paper around the edges. Afterwards, tape it to whatever surface you need it for. I chose a window!

Alternatively, you can fold the parchment in half like a booklet, and write the poem/spell on the inside, and then Algiz on the outside. It makes it more discreet and small. I decided to use this method on the door into the room.

And there you have it! How to make a beautiful, powerful, but simple talisman. You can put together a couple in just a few minutes! I made three in about fifteen-twenty minutes.
And there you have it! The first course in Magick User's University, Spellcraft 101. Hope you join us in class again soon!
Questions, ideas, comments? Make sure to follow and contact us on Facebook! ♥
I really enjoy how you put pictures of what the talisman can look like once it's completed. Not only that you give options so that we know it doesn't HAVE to look like what you did. Very nice.
ReplyDeleteTalismans should be as personal as possible since they're, well, working for YOU. Unless you were making them for someone else, but that still means they have to be somewhat personalized or else it won't feel special.
ReplyDeleteVery nice lesson on how customizable they can be. It's not a lot of those books that say "You have to do this or it won't work" type thing.