Showing posts with label spellcraft 101. Show all posts

Monday, 29 August 2011

Spellcraft 101 - Pauper-to-Prince Prosperity Box


Its time to break out the fun stuff guys! Magick User's University is all about interesting crafts that can be useful during your travel through the world of Magick. Today, we're going to focus on a project of making a Prosperity Box today in Spellcraft 101.

+ So what is a Prosperity Box?
Lore was the one who actually handed this information down to me from something that her grandmother did. Her grandmother would put money in a box, and stick in a spell or prayer in the box with it, and leave it out in the open to bring in money to the home. Having just moved into our new apartment and attempting to secure jobs, this seemed like a perfect opportunity to try it out.

And, I found out it did an amazing job! I'm happy in my apartment, and with a great new job that I absolutely love, and starting classes in just a couple of days! Because of this, I decided, as a University Witch, to share this spell with all of you, and hope it brings the prosperity you need in your own life! Besides, who couldn't use a bit of prosperity in their life?


+ Pauper-to-Prince Prosperity Box +

This is a pretty short project that you can do at home. You have the option of doing this while burning incense or candles to add some “oomph” to your spell. I personally an fine with merely getting into a quiet area and into the zone before I start.


+ Materials +
A pen or pencil
Paper
A box or container
Money!

This is a pretty easy project, which is always good. When Lore told me about it, I thought it was a splendid idea! When you think about it, putting precious items or money in a box, pouch, or safe isn't uncommon, is it very common, and thus I felt a bit silly upon hearing it. Why didn't I think of something that simple before? The best part is, the materials are easy to find around the house. I made it because I was looking for a job, and was a bit worried about the financial situation of our new apartment, for which was being paid for by financial aid from school (however, everything else would have to come from our own pocket). You can use it for yourself, for finding a job, pulling more money into your pocket (who doesn't want more money?), and for success in all things you do.

+ One: Get into the right mindset. Remember what the prosperity box is for, and concentrate on that purpose as you collect your materials. When you are done, settle down and start first with the sheet of paper and pen. On here, you will write out a spell for what you want to bring into your life. It can be general, or specific. It all depends on you.


For those whom are not spell inclined, I've written a general one for you below that you can use!

The branches of the Prosperity Tree
Tremble, shake, and shimmer for me
And rain down riches, of jewel and heart
May your good grace and I never part.
So mote it be.

Since this box was for both Lore and I, I wrote down two different poems, both directed to one of our patron gods.


+ Two: After writing out your spell, pull out the box you've chosen.

Mine has an elephant!

Anything you find for a box is fine. Mine is actually a disposable tea caddy made of metal. Why you would want to dispose of it is really beyond me. In fact, I had it for years because I just liked how it looked. The next thing you know, I had a use for it! This is the life of a future shop owner and current pretty-object magpie, haha. Your own box could be something very plain, like an old jewelry box, or a ring box, or even a shoe box if nothing else (if you have younger siblings, their shoes are smaller and thus would be better for this project).

After getting your box, bust out the money! Oh, but wait! What are you putting in there?

The prosperity box will not work if you merely throw a few pennies and nickles in there and call it a day. To give is to receive is the adage, and you need to put forth effort by putting forth some money. Now, we're not talking about like, serious money here. But if should be a noticeable amount, something that you could perhaps miss or say, “I could buy a ____ with that”. Since food is always of importance, our first thought was, “enough to buy a cheap meal”. We're university students, after all. Lore and I put in, I believe, four dollars and change in our mixed currency, United States currency and Canadian currency. Four dollars is a meal at McDonalds (a dollar meal, at least). Apparently, the gods believed it was enough.


Stuff it in the box, and fold up the spell and tuck it in afterward. Close the box. We're almost done!


+ Three: After completing the box, find a place out in the open to put it. We chose our bedside table! It seemed to be the best bet, and there it stays, slowly pulling in good fortune. I think that touching it, thanking it, or even giving it a gentle shake while asking it to bring you good fortune in an endeavor, such as before a job interview, seems to work well! And now, I'm going to go and give it a shake on the publishing of a book, haha! ♥ I hope it works as well for all of you as it has for me!


And there you have it! The first course in Magick User's University, Spellcraft 101. Hope you join us in class again soon!

Questions, ideas, comments? Make sure to follow and contact us on Facebook, or if you're feeling zany, check us out on Tumblr! ♥

Thursday, 28 July 2011

Spellcraft 101 - Witch Bottle


Its time to break out the fun stuff guys! Magick User's University is all about interesting crafts that can be useful during your travel through the world of Magick. Of course, not every spell is filled with beauty and sparkles. Some of those spells can be downright nitty and gritty. Today, we're going to focus on a project of making a Witch Bottle today in Spellcraft 101.

+ So what is a Witch Bottle?
A Witch Bottle is what is sounds like: a spell in a bottle. By putting relative contents in a bottle, you would either bury it on your property or keep it somewhere in your vicinity. You would “shake to activate”; once you shook the bottle it unleashed, or re-energized the spell.

While the spell itself doesn't have a particular “shelf life”, you as the creator knows when its time to destroy the bottle and make a new one to serve its purpose.

Sound interesting? Read on to get the dirt on this nitty-gritty type of spell casting!


+ Evil Beware Witch Bottle +

This particular Witch Bottle serves the ultimate purpose: the protection of hearth and home. That encompasses many things, such as possessions, family members, pets, as well as guests.

The materials can vary greatly from bottle to bottle, but below is what I used. In the steps below I will also let you know what was originally used in place of some things. Its up to the witch to decide what goes in their own personal bottle.


+ Materials +
A glass bottle (any size but a small one is best)
Paper and pen
Dirt (from your house)
Rain or Holy Water (optional)
Sage
Dimes
Pennies
Cooking Oil


The Evil Beware Witch Bottle serve a lot of purposes. Its a real feeling of traditional witchcraft, so even though the end result is not pretty at all, there is a certain sense of accomplishment upon its completion. Also, knowing that its being used for a good purpose always adds a certain sense of urgency and determination to it. You may find yourself putting a lot of effort in it; I felt drained upon finishing it. I decided to make one as Lore and I have moved into a new place together, and I wanted to make sure that wonderful things happened while we were living here, and that we were safe. It also protects our guests, as well as our possessions and property. The list above is merely what's in this particular bottle; but substitutes and traditional materials will be touched upon.

Under the list of materials can go a more in depth description of the project, such as what it does, why I myself am making it, and then, why other people might want to make it for themselves. Give a reason why I am using THOSE articular materials if its not obvious, but more info on hat can go in each step.

+ One: Get into the right mindset, of course. Think about what the purpose for this bottle is for, and start working. First, you'll need your bottle, of course.

This is a jam jar. Works perfectly well.

Once you have that, its time to bust out a small piece of paper and a pen. On this, you'll write your spell. I made a personalized one for Lore and I, trying to utilize our patron gods and goddesses. 


For those who feel they're not so adept or creative when it comes to creating spells, I've conjured up this one for you to use instead:

God and Goddess
Within my hand I hold the key
To your saving grace, and righteous face
Protect, and love, and defend this place.
Deflect all those whom bring us harm
And welcome luck with open arms.
Bless the spirits, the Gods, and the Goddesses Three
So Mote it Be.

Write the spell down on the paper, fold it, and then stick it in the bottle.


+ Two: Now, to get down and dirty. Take the bottle and a trip outside. Find some dirt on your property; the fact that its on your property (such as your yard), is important! This is the soil your bottle is meant to protect. If you have the time, you can also collect dirt from a place you feel safe at, such as your parents' house, or a church (provided its not considered defacing property). Put in a little bit—how much is really up to you but remember that a lot more has to go in here than just dirt and a folded up spell.


+ Three: Whether you've got holy water or rain water, either way, it will help. It started raining as I made the witch bottle, so Lore thought it would be a good idea to collect some rain water from outside. Great idea! Add in the rain water or the holy water to your bottle. No idea where to get holy water? Some metaphysical shops actually sell it, but if you have the time (like, a month's worth!) you can make it yourself by getting a bottle, putting tap water (or even a water bottle of spring water), and setting it at the windowsil (or outside preferably) when the full moon is out for the whole night.

+ Four: Add the sage! Sage is used for purification and to ward away evil. White sage is the best, though some people (such as myself) do not like the smell. This bundle is burnt because Lore uses it for purification spells and to banish negativity.


+ Five: After the sage, we added our dimes and pennies. So what's the deal with the coins? Dimes are said to be gifts to spirits who have aided us. Back in ancient Greece, mercury was the metal of choice for the god of the Underworld, Hades. When a person died, coins of mercury would be placed over their eyes, so that when the soul reached the Underworld, they had the fare to pay for their boat ride over the River Styx. Dimes used to be made of mercury many, many years back, so using dimes now is merely symbolic. Placing them in the witch bottle can both in turn thank any good spirits for their trouble, as well as ward off the negative ones by offering a tribute to leave in peace. Bribe them shamelessly!

"If you don't pay no tolls, then we don't get no rolls!"

The penny on the other hand is universal for good luck (heads up of course!), so placing it in the witch bottle invites good luck and fortune to find its way into your home.


Starting to look rather witchy, isn't it?

+ Six: The final ingredient in this witch bottle is... cooking oil. Does that seem off to you? Everything else has seemed to make sense, but what could cooking oil have anything to do with banishing negativity? This is where you really learn about the witch bottle and its place in magick history.

The cooking oil is meant to replace noxious fluids and ingredients... the stuff most people draw the line at when it comes to magick and witchcraft in general. We here at University Witch promote free thinking when it comes to the materials and things used for all spells, so we don't shy away from letting readers know the formal ingredients. We also provide alternatives, for the faint at heart. In the end, its up to the witch.

In a witch bottle, the ingredients to really “seal the deal” here, were the following: urine (yes, your own, and perhaps even from the others in the house), bent and rusty nails (to inflict damage to those whom would dare to enter), broken shards of glass (the same reason), menstrual blood, semen, toe and fingernail clippings, and hair (from either the witch and/or a pet if they have black fur). These are the ingredients that the cooking oil replaces; the logic behind it is that oil is an ingredient needed but not necessarily desirable.

Using either the traditional ingredients or the cooking oil, fill the bottle all the way to the top. You can also use a combination of the ingredients (such as, if you're comfortable with the broken glass, nails, and hair, but not the urine and blood). Its really up to you.
Ghastly~

+ Seven: Screw the lid tightly (you can even add in glue to keep it secure if you want), making sure its closed all the way! And there you have it. A witch bottle. Is it pretty? Probably not, but that's not the point. This is nitty, gritty, and powerful spell casting. Now that its done, you can either bury it outside (on your own property), deep in the ground. The closer to your front door, the better. For those that live in the city or an apartment complex, the best thing to do is put it in the very back of a cabinet, in the corner, and forget about it—but don't neglect it. Make sure to shake it from time-to-time to renew the strength of the spell.


And there you have it! A rather traditional and somewhat devious course at Magick User's University, Spellcraft 101. Hope you join us in class again soon!

Questions, ideas, comments? Hit us up here, or follow and contact us on Facebook! For those whom desire a lighthearted and fun view on witchcraft and magick in general, you can follow us on Tumblr!

Sunday, 12 June 2011

Spellcraft 101 - Book of Old Soulls


Its time to break out the fun stuff guys! Magick User's University is all about interesting crafts that can be useful during your travel through the world of Magick. Today, we're going to focus on a project of making the Book of Old Soulls today in Spellcraft 101.

+ So what is the Book of Old Soulls?
While the title is cute and all, it is more of a reflection as to the nature of the project itself. While I have a really nice, huge hardcover Book of Shadows, I reserve it to write down spells that have worked, to make a gorgeous copy of it and then I can pull out the book when its complete, and the spells will be in there, nice and orderly for me. However, of course I'm always trying to make new spells, and taking notes on things I learned, so I wanted something I wouldn't feel bad scribbling inside of. Of course, even though it was going to just be “scribbled inside of”, I still wanted it to look nice—but not only nice. Archaic. Ancient. Old. I don't care for “new” or “modern” looking things, and my friends always call me an old soul. So, hence the title. (And of course, the  play on my name, Soull, har har.) After scouring plenty of bookstores, new and used, for the perfect journal, I couldn't find anything. Why? The lines! I can't stand lined journals! So, I decided after some deliberation, that I would make my own.


+ Book of Old Soulls +

This is a good how-to for taking a journal you like (say you adore the cover), and making it look old and well worn. If you wonder why you'd want to do that to a new book, think about why people make rips in jeans. There are always ways to vary the end design, but though trial and error, I've put the way that seemed to work best. Lets go!

It all begins with a little ingenuity!

+ Materials +
Blank Book
Sandpaper (or) Exacto-knife
Black Tea (such as English Breakfast)
Spoon
Plate (or) Towel


If you're not interested in making a sort of “scratch paper” book like me, this could also work for a diary, your own personal Book of Shadows, or even if you want it for another paper project, you can do this to separate sheets. This is pretty much just one step short of going all out and making your own book... which I considered until I realized how much I detest leather-work.

The instructions may seem a little difficult, but this is in case two different scenarios play out, depending on the book you've selected. If you're only dying sheets of paper and don't have a whole book, you can skip step one.

+ One: This is the fun part: selecting your book! Find a nice book, and make sure you're happy with the cover. I can't tell you what kind of book to get on this one; this is all about your personal tastes and originality. If you're trying to go for an “old” look, I suggest leather/faux leather, or at the very least, the colors black, brown, red, and dark green. Earthy colors work the best!


Once you've decided on your book, open it up and check out the binding. Has it been sewn into the spine of the cover? Or has it been glued? If its been sewn in, great! It won't fall out of its bindings during the dying process. If its glued, you're in for a rocky time like I was. Take the time to removed the spine. Glue isn't that tough, so you might be able to rip it out, or, of the book is bound in cloth or a paper cover like mine, you can dip the spine in hot water, and wiggle it out. Once you do that, you can continue on.


+ Two: Take your chosen book and take a glimpse at the pages. This part is optional, but I feel it gives a more used look to your book. Take some sandpaper, or an exacto-knife, and start scraping at the edges of the book, like so.


Move the sandpaper the opposite direction of the spine to the edges, going against the grain of the paper. Choose random spots on the edges of the page, sometimes rubbing longer against it than other times. Doing so will make a deeper divot into the page.


Looking good so far! Those black grains are the sandpaper I used. If you have those on your book, you can blow them off after.


+ Three: Once the egdes are done, its time to do the other pages! Open up the book, and from there, stares scraping the sandpaper in multiple directions over the page. It would be too time consuming to do every page, but go through and every few pages, mark on them in the sandpaper.


It can be one long scrape, or just scraping at the corners, the middle... have fun! Sure, at the moment you might not really see a difference, but that happens when you dye it! Keep it up until you've done all the pages you want.

+ Four: Bust out a large pot ( large enough to fit your book) and some tea, and get to boiling it! Alternatively, boiling tea and then pouring it in a large pan or dutch oven

Double, Bubble, Toil and Trouble! That about sums this project up.

Make sure the tea is brown, before plucking out the bags. If you're using loose leaf tea, make sure to keep it in one of those cute straining balls so the leaves are not all over the place!

+ Five: Time for the long part! This will take awhile so make sure you have plenty of time on your hands. Take a small section of pages and dip the book (or separated pages) into the pot, submerging slowly. Try not to dip it all the way to the top where the binding is, lest the thread and glue holding it together unravel or melt due to the hot tea!


Unfortunately, no matter how many times you dip, the middle pages will not get wet if you try and just submerge it all at once. You'll have to dip it in sections like instructed! Believe me! I tried it, and it didn't work.

+ Six: To get into the edges nearest the base, take a spoon, scoop up the tea, and gently pour it along the edge, allowing tea to slide down the page and back into the pot! If your pot is big enough, you might not have to do this, but mine didn't quite fit the book so I had to make do.


Be careful not to get it all over your cabinets!

+ Seven: During step five and six, you might want to set the book down on a plate or towel to rest for a bit. Too much water/tea will make your pages fragile and subject to tearing. Give them a few minutes or so after submerging (or when you fee they might tear), and during that time do something else, such as read a book or even surf the net. Go back and repeat until your pages are a bit darker than you want them to be; once they dry, they'll be lighter!


+ Eight: When you're all done, take it outside and lay it out to dry! Outside, fresh air does better, plus it keeps the smell of the tea out of the house while it dries. It smells a little strange, and the indoor air doesn't dry it nearly as fast.


It might take a few days, but the end result will be great! Now its free for you to use in whatever means you desire!

And there you have it! Another course in Magick User's University, Spellcraft 101. Hope you join us in class again soon!

Questions, ideas, comments? Make sure to follow and contact us on Facebook! ♥

Wednesday, 25 May 2011

Spellcraft 101 - Flower Petal Spell Paper

Its time to break out the fun stuff guys! Magick User's University is all about interesting crafts that can be useful during your travel through the world of Magick. Today, we're going to focus on a project of making Flower Petal Spell Paper today in Spellcraft 101.

+ So what is Flower Petal Spell Paper?
Well, its a fancy name for paper with flower petals in it. There are a lot of great things you can use it for besides spellcraft, such as scrapbooking, making bookmarks, and other crafts. It all depends on how many flower petals you put in it, and exactly what purpose this paper is for.


+ Flower Petal Spell Paper +

The Flower Petal Spell Paper is great for spellcraft and writing, as well as looking generally beautiful for any papercraft you have in mind.


+ Materials +
Flower Petals (in any color!)
Any kind of paper (construction, newspaper, etc)
Scissors
Duct tape
Window screen (or anything like that)
Towels
Bowls
Blender

The Flower Petal Spell Paper will be used for a particular endeavor in particular: making earth spells. For these particular spells, you write out an endeavor, wish, or project that you would like to see come true or flourish, and then you bury the small spell paper in the ground in efforts to promote your desires! Its a great gift for someone, or just to keep for yourself. Below I'll have a few suggestions written out in case you would like to present them as gifts.

+ One: Time for the hunt! Even as witches, most people are more likely to spend their time indoors (I know I do). So, time to go out and take a walk! Collect as many flower petals as you can! In efforts to help with my enthusiasm, I took a few plastic cups with me (along with my darling Lore), and we set out on the journey of collecting flowers.

 Beautiful red flowers! I fell in love with the the moment I saw them!

The mighty Lore Sagemaker, forced to pick cute yellow flowers. ♥


+ Two: After collecting your bounty, head back. Cut out a square of screen, and fold the duct tape around the edges to form a stable frame. If you want, you can use something like popsicle sticks to make a frame and tape around that.


+ Three: Once you've made your screen, tear up some paper and stick it in the blender. Cover it with enough water to saturate the paper. And then! Whirl away, until its a nice, thin porridge/oatmeal like substance.

As for me, I actually don't own a blender, so I got to watch Lore use one of her top-notch cooking utensils and beat away. She did a good job.


You'll actually want it a bit more thin than the end result here... but this was as good as we were getting without a blender. Anyway, it will work just fine, but the paper won't be as fine and thin (though I was surprised at how nice it turned out regardless). At this point, mix in the flower petals with the soupy substance and get it nice and mixed in there. If you have anything else, like seeds, this is the time to do it as well! You can also add a hint of cinnamon in order to make it smell nice!

+ Four: Using a spoon, spoon some of the mixture onto the frame. Smooth it out, using the back of the spoon to press out some of the water through the screen. Make sure to push any of the mixture off the frame and onto the screen.


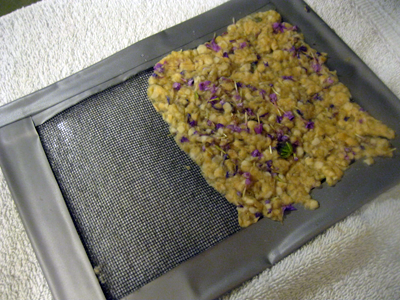
+ Five: After getting the mix onto the screen, very, very carefully tip the screen over onto a towel (mixture down). Put another towel over and and press down on it to get rid of the excess water. Hold it for at least thirty seconds, continually dabbing. Once you've cone that, very slowly peel the screen away, until on the towel you have this!


Pretty neat, huh? Continue this process until you've finished with all of the paper.


+ Six: Once you've finished, transfer them carefully to a cookie sheet and leave them to dry outside. And you're done! Now you have it! Gorgeous flower petal spell paper!

So what do you do with it afterwards?

If you're planning on giving it as a small little gift to a friend, something general and heartfelt is always a great way to go. You can even write them instructions on a separate sheet of paper, telling them what to do with the spell paper. Tear the sheets into thin strips. On the paper itself, in ink, you can write either a notion, or a spell! Listed below are a few ideas. Think about what the person you are giving it to might need and attempt to cater it to them!

Good Luck
Sweet Dreams
Fortune
Good Health
Make a Wish
“Bring _____ (their name) fortune and prosperity, By this spell so mote it be.”
“Buried deep into the earth, Grow the seeds of wishes true.”

You can present it to them anyway you'd like afterwards. The project is a bit of work, but when you see the end results and how beautiful it looks, it will be worth it! ♥

And there you have it! Another great course in Magick User's University, Spellcraft 101. Hope you join us in class again soon!

Questions, ideas, comments? Make sure to follow and contact us on Facebook! ♥

Thursday, 14 April 2011

Spellcraft 101 - Talismans


Its time to break out the fun stuff guys! Magick User's University is all about interesting crafts that can be useful during your travel through the world of Magick. Today, we're going to focus on a project of making a simple talisman today in Spellcraft 101.

+ So what are Talismans?
A Talisman is like an amulet—they are both objects used to promote and bring good luck, protection, or whatever the object is intended for to the user. History has seen many pass through the ages. The Ancient Egyptians had many dedicated to fertility, love, and even the Evil Eye. The difference between a talisman and an amulet, however, are merely the way they are activated. Amulets are passive—they are designed to work when the time comes for them to be activated. Talismans, on the other hand, are constantly working around the clock to ensure the success of their intended purpose.

There are many kinds and ways to make talismans, but this is a quick and effective way to get started. For this particular amulet, is a nice, general good one for protection.


+ SOULL'S PROTECTION TALISMAN +

This talisman is very general purpose, but made to be powerful, and incorporates many magickal elements within it. I'll explain them as we go.


+ Materials +
A pen or pencil
A marker
Two different colors of paper
Scissors
Tape

Yes, the picture quality was stellar. It was dark, all right!

Now, when collecting materials, this is a general rule: the better quality the materials, the better the result. If you “slap together a talisman”, it in return will “slap together some protection” or whatever you had made it for. If you want it to last a long time, take time and care in creating it. Now, I'm not saying make it out of solid gold or whatever, but using nicer materials than say, notebook paper, will yield greater results. For the talisman here, I'm using parchment and some nice scrapbook paper from an art supply store. The pen is a Faber-Castell—very nice and fine for making strokes. You'll see the results later.

For my own talismans, I like them pretty. I feel, for me at least, the better looking they are, the better the result. It might be a “judge a book by its cover move”, but I feel that the better looking it is, the more care put into them. For the backing of the talisman, I used some printed card stock from the scrapbook section. I chose the colors red, because red is strong and powerful. I didn't want calming protection, I wanted some that was BAM, in your face. So I chose red. Its energetic.

So lets begin, shall we?

+ One: Get into the right mindset. Remember what the talisman is for, and concentrate on that purpose as you make it. Start by cutting out the paper the size you want the talisman. Use a rectangular shape! Cut out the paper you are using for the backing larger than the one you will be writing on.

+ Two: Take the forefront sheet and grab your pen or pencil. I chose a pencil... in case I messed up.

Which I did. Several times.

This is where you will write your spell for protection. I decided, due to a conversation with my girlfriend (who is getting into runes... exciting!), that I would incorporate the runic alphabet. There is a certain power in mere symbolism that sometimes words fail to give.

I decided instead of a spell, to use the poem dedicated to the rune Algiz. It is a rune used for protection, thus making it perfect for the task at hand. The poem is from the Anglo-Saxon Rune Poem, and is as follows:

The Elk-sedge has its home most oft in the fen
It waxes in water, wounds grimly
The blood burns of every man
Who makes a grasp at it.

And, alternatively (if you'd like a modern translation):

The Elk-sedge usually lives in the fen
Growing in the water, it wounds severely
Staining with blood any man
Who makes a grab at it.

Print out the poem carefully in pencil on the talisman.

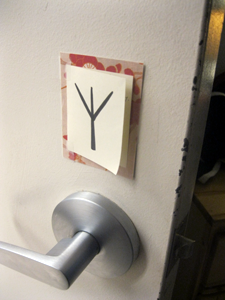
+ Three: After printing out the poem, take the marker and over it, draw out boldly the rune of Algiz. The symbol looks like a path that splits into three. It should look a little like this after its all done.


Very nice! You're almost done! The hard part is over.

+ Four: Tape the two papers together, so that the rune is showing on the outside, and you can see the color of the other paper around the edges. Afterwards, tape it to whatever surface you need it for. I chose a window!


Alternatively, you can fold the parchment in half like a booklet, and write the poem/spell on the inside, and then Algiz on the outside. It makes it more discreet and small. I decided to use this method on the door into the room.


And there you have it! How to make a beautiful, powerful, but simple talisman. You can put together a couple in just a few minutes! I made three in about fifteen-twenty minutes.

And there you have it! The first course in Magick User's University, Spellcraft 101. Hope you join us in class again soon!

Questions, ideas, comments? Make sure to follow and contact us on Facebook! ♥